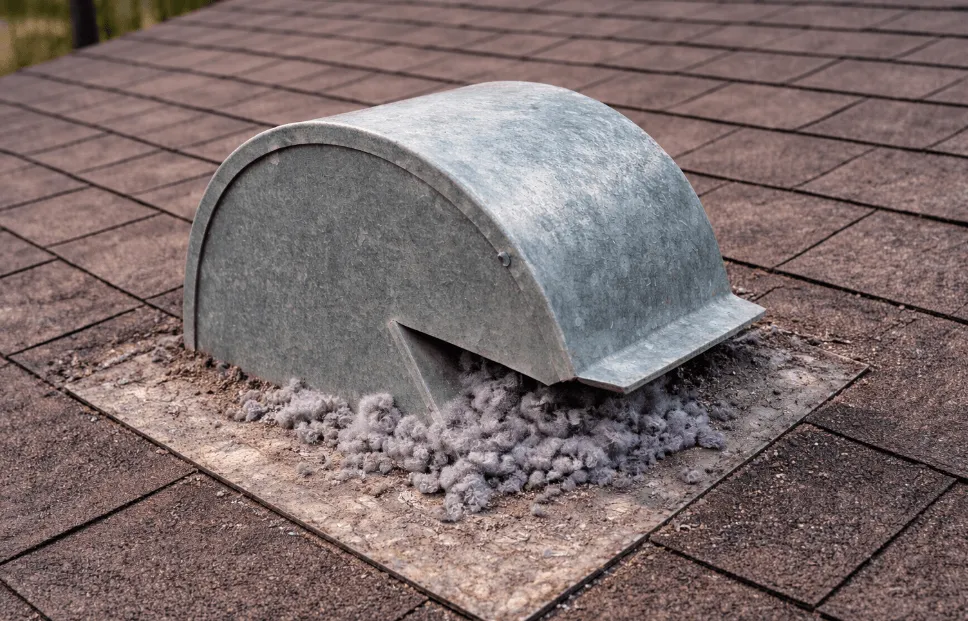
If your dryer vent exits through the roof, you’re dealing with one of the trickiest setups to maintain — and one of the most critical. A clogged roof dryer vent doesn’t just slow drying times and drive up energy costs — it’s a genuine fire hazard. The U.S. Fire Administration points to dirty dryer vents as the leading cause of home dryer fires every year.
Here’s what we’ve learned after servicing thousands of homes with roof-terminated dryer vents: most homeowners assume they need to get on the roof to clean them. You don’t. With the right tools and approach, the majority of lint buildup can be cleared from inside your laundry room — no ladder required. This guide walks you through exactly how to do it, step by step, including the tools you’ll need, how to access the full vent run from inside, and the telltale signs that it’s time to call in a professional.
Let’s get your vent cleared and your home safer.
TL;DR Quick Answers
How to Clean Dryer Vent on Roof
You don’t need to climb on your roof to get the job done. After servicing thousands of roof-vented dryer systems, we’ve found the most effective approach is cleaning from inside your laundry room.
Here’s the process in brief:
- Unplug the dryer and disconnect the vent hose from the wall
- Vacuum loose lint from the duct opening and dryer exhaust port
- Attach a flexible rod brush to a cordless drill
- Feed the rotating brush into the duct opening toward the roof
- Work slowly through bends and repeat two to three times
- Vacuum again, reconnect everything, and run a test cycle on high heat
What you’ll need:
- Flexible rod cleaning kit (12+ feet)
- Cordless drill
- Shop vac or vacuum with a hose attachment
- Screwdriver for the vent clamp
- Flashlight
Key tips from our experience:
- Clean at least once a year — twice if you dry heavy loads frequently
- Never force rods through bends — patience prevents duct damage
- Replace plastic or foil vent hoses with rigid metal duct
- If airflow doesn’t improve after cleaning, the blockage is likely at the roof cap — call a certified technician
The entire job takes 30 to 45 minutes and requires no roof access for most standard vent runs under 20 feet.
Top Takeaways
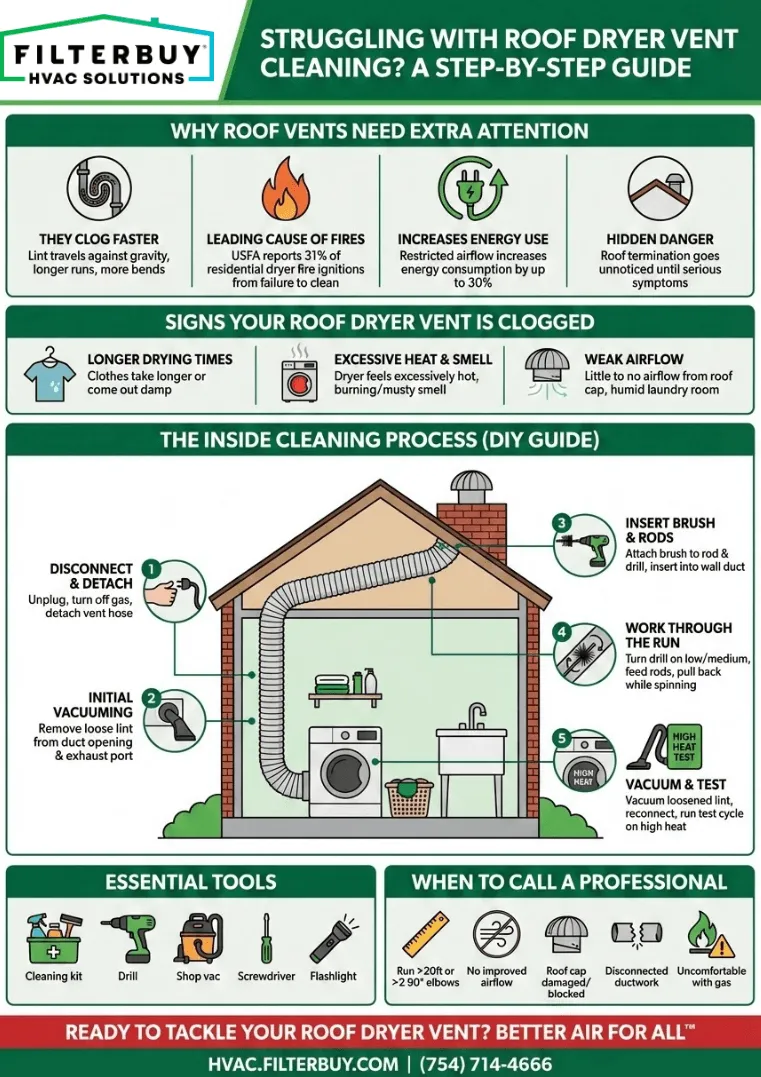
- Roof-vented dryers clog faster. Lint travels upward against gravity through longer runs with more bends. It accumulates in areas you can’t see. Annual cleaning is essential — not optional.
- You can clean it from the inside. A flexible rod kit, cordless drill, and shop vac are all you need. The job takes less than an hour. No ladder or roof access required.
- Failure to clean is the #1 cause of dryer fires. The USFA reports it accounts for 31% of all dryer fire ignitions. The NFPA estimates 2,900 home dryer fires every year. Most are preventable with basic vent maintenance.
- A clogged vent costs you money on every load. Restricted airflow increases energy use by up to 30%. A 45-minute cycle stretches past an hour. The problem compounds until the vent is cleared.
- Know when to call a professional. Vent run exceeds 20 feet. Multiple 90-degree elbows. No improvement after interior cleaning. A certified technician can access the rooftop and inspect the full run with a camera.
Why Roof Dryer Vents Need Extra Attention
Dryer vents that end at the roof pose special maintenance problems as opposed to side-wall exits. The vertical run streamlines require the lint to run uphill due to gravity, and this increases the chances of the lint settling and accumulating in the ductwork. Include some bends, some elbows, and a few more runs of ducts, as found in roof-vented systems, and you have a system that gets blocked more quickly and is more difficult to see in the case of a visual inspection. Through our experience in the repair of these systems, homeowners with roof-terminated vents ought to expect to service them at least once a year and more frequently if they are running multiple loads per day, or in dry cleaning heavy fabrics frequently.
Signs Your Roof Dryer Vent Is Clogged
Before you start cleaning, it helps to confirm that a clog is actually the issue. These are the most common warning signs we see in homes with roof-vented dryers:
- Clothes take noticeably longer to dry or come out damp after a full cycle
- The dryer feels excessively hot to the touch during operation
- A burning or musty smell when the dryer is running
- Little to no airflow coming from the roof vent cap when the dryer is on
- The laundry room feels more humid than usual
- Lint is visible around the dryer’s lint trap housing or behind the unit
If you’re noticing two or more of these, it’s time to clean the vent — don’t put it off.
Tools You’ll Need
Gathering everything upfront makes the job faster and smoother. Here’s what we recommend based on what works best for roof-vented systems:
- A dryer vent cleaning kit with flexible rods (available at most hardware stores — look for kits designed for runs of 12 feet or more)
- A cordless drill to power the rotating brush attachment
- A vacuum with a hose attachment or a shop vac
- A screwdriver or nut driver to disconnect the vent clamp
- Microfiber cloths for cleanup
- A flashlight to inspect inside the duct
Skip the leaf blowers and DIY hacks you might see online. From what we’ve seen in the field, they tend to push lint further into the vent or compact it at the bends rather than actually clearing it out.
How to Clean Your Roof Dryer Vent From Inside — Step by Step
Step 1: Disconnect the Dryer
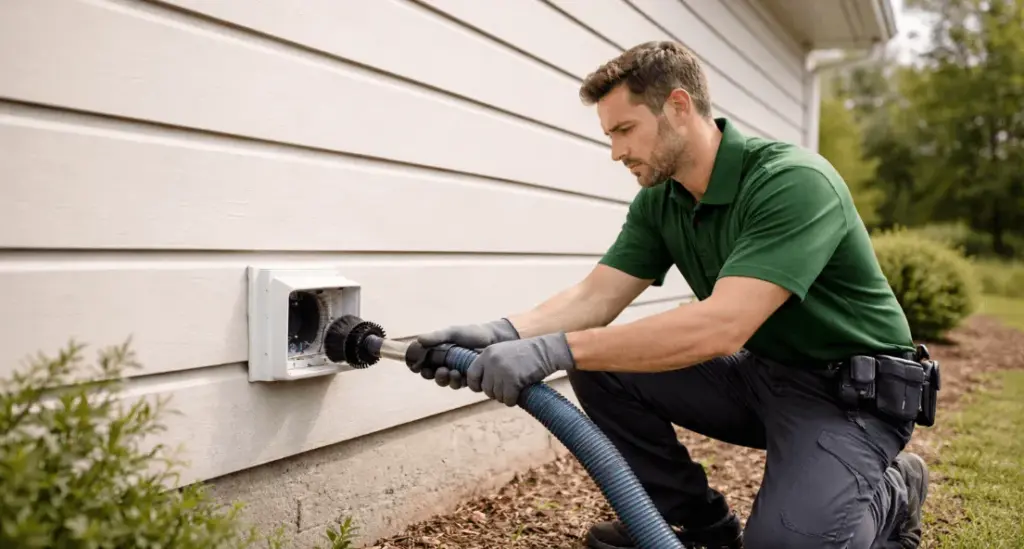
Unplug the dryer from the electrical outlet. If you have a gas dryer, turn off the gas supply valve behind the unit. Pull the dryer away from the wall carefully, giving yourself enough room to access the vent connection at the back.
Step 2: Detach the Vent Hose
Loosen the clamp securing the flexible vent hose to the wall duct opening. Gently pull the hose free. This is a good time to inspect the hose itself — if it’s a foil or vinyl accordion-style hose, we strongly recommend replacing it with rigid or semi-rigid aluminum duct, which resists lint buildup and meets current safety standards.
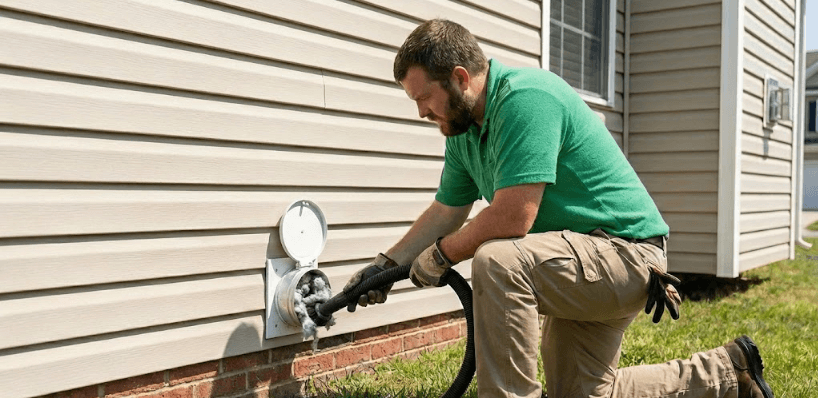
Step 3: Vacuum the Exposed Duct Opening
Use your vacuum or shop vac to remove any loose lint from the duct opening in the wall and from the back of the dryer’s exhaust port. You’ll likely be surprised by how much collects here, even with regular lint trap cleaning.
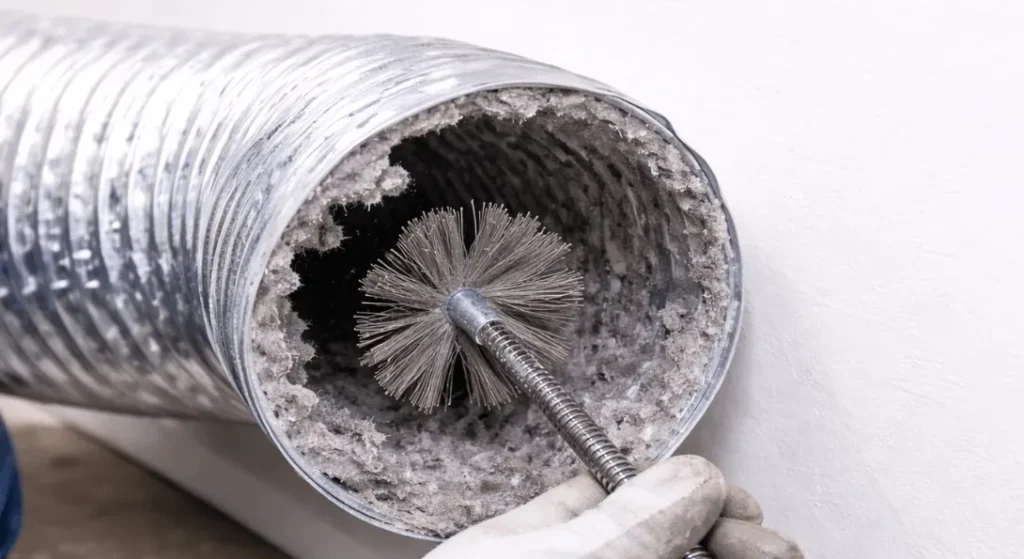
Step 4: Insert the Cleaning Brush and Rods
Attach the round brush head to your first flexible rod, then connect the rod to your cordless drill. Insert the brush into the wall duct opening and turn the drill on at a low to medium speed. As the brush rotates, it loosens lint from the interior walls of the duct. Feed additional rods in as you push deeper toward the roof. Take it slow at bends — forcing the rods can damage ductwork or disconnect joints inside the wall.
Step 5: Work Through the Full Run
Continue feeding rods until you’ve reached the full length of the vent run or feel resistance at the roof cap. Then slowly pull the rods back out while the brush continues spinning. This pulls loosened lint back toward you. Repeat this process two to three times for the best results.
Step 6: Vacuum Again and Reconnect
Brush all the lint that the brush brought back into the opening. Attach the vent hose once again to the wall duct, put the wall duct back in the clamp, and force the dryer back into place.
Step 7: Run a Test Cycle
Use high-heat level and no clothes in the dryer and run 10 to 15 minutes. Assuming someone can do it, make sure to open the roof vent cap to make sure strong air is moving through. In case of a weak or no airflow, the clog can be in the roof cap itself, and that is when it would be better to call on a professional.
When to Call a Professional
Cleaning from the inside handles most of the buildup, but there are situations where professional service is the safer and more effective option. We recommend calling in an HVAC or vent cleaning professional if:
- Your vent run exceeds 20 feet or has more than two 90-degree elbows
- You can’t feel improved airflow after cleaning from the inside
- The roof vent cap is visibly damaged, blocked by debris, or sealed with bird nesting
- You notice disconnected ductwork or damage inside the wall during cleaning
- You’re not comfortable working around gas connections
A professional can access the vent from the rooftop, inspect the entire run with a camera, and clear blockages that interior cleaning can’t reach. It’s a worthwhile investment — especially for longer or more complex vent configurations.
Keep Your Vent Clear Year-Round
Once you’ve done the hard work of cleaning the vent, a few simple habits will help you stay ahead of future buildup:
- Clean the lint trap before every single load — no exceptions
- Inspect the vent connection behind the dryer every few months for lint accumulation
- Schedule a thorough vent cleaning at least once a year, or twice if you have a large household
- Check the roof vent cap seasonally for debris, pest activity, or flap damage
- Avoid overloading the dryer, which produces more lint per cycle and strains airflow
A clean dryer vent doesn’t just improve performance — it protects your home and your family. A few minutes of maintenance go a long way toward preventing a problem you never want to deal with.
“In our experience servicing thousands of roof-vented dryer systems, the number one mistake homeowners make is assuming the lint trap catches everything — it doesn’t. Roughly 20 to 30 percent of lint bypasses the trap every cycle, and in a roof-terminated setup where it has to travel upward, that buildup accumulates faster than most people realize, which is why annual cleaning from the inside out isn’t optional — it’s essential.”
Essential Resources for Safely Cleaning a Roof Dryer Vent
Cleaning a dryer vent that comes out of the roof does not need the right tools, but the right information. These seven materials are the authoritative documents of government agencies and safety organizations that give you the necessary critical information on how to keep your roof-termined dryer vent safe, efficient, and well in line with the existing building codes and fire safety regulations.
1. Understand Why Dryer Vent Fires Happen and How to Prevent Them
USFA confirms that failure to clean dryer vents is the most contributing factor when it comes to residential dryer fires -a risk that increases greatly in roof-terminated systems where lint moves up and collects more readily. This source offers fire prevention techniques and safety materials that can be downloaded and need to be checked by every homeowner before and after cleaning.
U.S. Fire Administration (USFA) – Appliance and Electrical Fire Safety
https://www.usfa.fema.gov/prevention/home-fires/prevent-fires/appliance-and-electrical/index.html
2. Follow the Fire Safety Standards That Professionals Use
National Fire Protection Association (NFPA) – Clothes Dryer Safety Tip Sheet recommends that the vents be cleaned annually, rigid or flexible metal venting material, and that the outside vent flap be checked periodically, all of which are key preventive measures in the roof-vented type of dryer when access is limited, and the buildup is not viewed as prolonged. It is the same criterion of the tip sheet adopted by the fire departments and certified technicians throughout the country.
https://www.nfpa.org/downloadable-resources/safety-tip-sheets/clothes-dryer-safety-tip-sheet
3. Know the Real Fire Risk Numbers Behind Clogged Dryer Vents
The CPSC estimates that approximately 15,500 dryer-related fires occur annually, resulting in deaths, injuries, and over $84 million in property damage. This safety alert also recommends replacing plastic or vinyl exhaust hoses with rigid metal duct — an upgrade that’s especially important for roof-vented configurations where heat resistance and smooth airflow are essential.
U.S. Consumer Product Safety Commission (CPSC) – Overheated Clothes Dryers Can Cause Fires
https://www.cpsc.gov/s3fs-public/5022.pdf
4. Protect Your Indoor Air Quality While Maintaining Your Vent System
A clogged roof dryer vent doesn’t just reduce dryer performance — it can push moisture, lint particles, and pollutants back into your living space. The EPA’s guide to improving indoor air quality explains how proper exhaust ventilation, including a clean dryer vent, plays a direct role in reducing indoor pollutant levels and protecting your family’s respiratory health.
U.S. Environmental Protection Agency (EPA) – Improving Indoor Air Quality
https://www.epa.gov/indoor-air-quality-iaq/improving-indoor-air-quality
5. See How a Clean Vent Directly Lowers Your Energy Bills
The DOE’s research demonstrates that restricted airflow from clogged dryer vents increases energy consumption and extends drying times — a problem that compounds in roof-vented systems with longer duct runs and vertical rises. Keeping your vent clear can reduce dryer energy use by up to 30%, translating to meaningful savings on your utility bills year-round.
U.S. Department of Energy (DOE) – Dryer Venting and Energy Efficiency
https://www.energy.gov/sites/prod/files/2016/06/f32/Dryer_Venting.pdf
6. Verify Your Vent System Meets Current Building Code Requirements
This source provides the specifications of the International Residential Code (IRC) concerning the degree of dryer exhaust ducts, the nature of materials, termination, and the restriction of bends. With roof-terminated vents, you should understand that each 90-degree elbow will cut in half the maximum length you can have your system, to know whether you will be able to clean your system internally, or whether outside help is needed.
Building America Solution Center (DOE/PNNL) – Proper Clothes Dryer Venting
https://basc.pnnl.gov/resource-guides/proper-clothes-dryer-venting
7. Find a Certified Technician When Professional Cleaning Is Needed
When a roof-terminated dryer vent is too long, too complex, or too obstructed to clean from the inside, the CSIA can help you locate a certified dryer exhaust duct technician in your area. As a nonprofit educational organization recognized by the NFPA, the CSIA sets the professional standard for dryer vent inspection and cleaning — giving you confidence that the job is done safely and thoroughly.
Chimney Safety Institute of America (CSIA) – NFPA Dryer Safety Tips
https://www.dryersafety.org/nfpa-safety-tips.html
Supporting Statistics
These statistics from leading U.S. government agencies confirm what we see firsthand when servicing homes with roof-terminated dryer vents — neglecting vent maintenance isn’t just inconvenient, it’s genuinely dangerous.
1. Failure to Clean Is the #1 Cause of Residential Dryer Fires
The U.S. Fire Administration (USFA) reports that failure to clean accounts for 31% of all residential dryer fire ignitions from 2018 to 2020 — the single leading contributing factor.
What we see in the field with roof-vented systems:
- Lint accumulates faster in vertical duct runs because it settles against gravity
- Homeowners rarely notice the buildup because the vent termination is out of sight on the roofline
- Unlike side-wall vents, reduced airflow at a roof cap is nearly impossible to detect without climbing up to check
- By the time symptoms appear indoors, the vent is usually already significantly restricted
Source: U.S. Fire Administration – Appliance and Electrical Fire Safety
2. Clogged Dryer Vents Cause an Estimated 2,900 Home Fires Every Year
The National Fire Protection Association (NFPA) reports approximately 2,900 home dryer fires annually, resulting in:
- 5 estimated deaths per year
- 100 estimated injuries per year
- $35 million in property damage per year
A significant portion of these fires originates in the exhaust duct and vent system — the exact pathway that roof-vented dryers depend on.
Why roof-vented systems face elevated risk:
- Longer duct runs create more surface area for lint to accumulate
- Multiple elbows cause lint to settle and compact at each bend
- The vertical transition point toward the roofline is the most common trouble spot
- Most homeowners never inspect this section of the duct
Source: National Fire Protection Association – Clothes Dryer Safety
3. A Blocked Vent Can Increase Dryer Energy Use by Up to 30%
Research referenced by the U.S. Department of Energy shows that dryers already consume roughly 6% of total household energy. A clogged vent can increase that demand by up to 30%.
This impact is amplified in roof-vented systems because:
- The dryer must push air upward through 15 to 25 feet of ductwork
- Most roof-vented runs include two or more 90-degree elbows that further restrict airflow
- Partial blockages force the dryer to run significantly longer per load
- A load that used to finish in 45 minutes can easily stretch past an hour
When customers report longer drying times, a partially blocked vertical vent run is almost always the culprit. Cleaning the vent delivers an immediate and noticeable drop in both energy costs and cycle times.
Source: U.S. Department of Energy – Dryer Venting and Energy Efficiency
Final Thought: Why Roof Dryer Vent Cleaning Shouldn’t Be an Afterthought
Cleaning a dryer vent that exits through the roof isn’t glamorous — but after years of servicing these systems, we can say with confidence that it’s one of the most underestimated maintenance tasks in any home. The combination of vertical duct runs, hidden termination points, and gravity working against airflow makes roof-vented dryers uniquely prone to problems that develop silently.
Why Roof-Vented Dryers Demand More Attention
- Lint travels upward against gravity, settling and compacting inside the duct
- The roof termination point is out of sight, so the buildup goes unnoticed
- Warning signs develop gradually — slightly longer drying times, a little extra heat — and most homeowners don’t act until the problem is well advanced
What the Data Tells Us
- Failure to clean is the #1 cause of residential dryer fires
- Clogged vents increase energy costs by up to 30%
- Thousands of preventable home fires are reported every year due to neglected exhaust ducts
What We’ve Learned From Working on These Systems
The biggest barrier isn’t difficulty — it’s awareness. Most homeowners don’t realize:
- The lint trap only catches a portion of the lint that the dryer produces
- The rest accumulates inside a duct they can’t see
- A basic cleaning kit and 30 to 45 minutes of effort can dramatically reduce their risk
The step-by-step process in this guide is designed to make that job approachable and effective for any homeowner willing to do it.
Know When to Call a Professional
We also believe in knowing your limits. Consider calling a certified technician if:
- Your vent run exceeds 20 feet
- The duct includes multiple sharp bends
- You’ve never cleaned the vent and suspect significant buildup
- You need a camera inspection or rooftop clearing for heavy obstructions
No DIY shortcut replaces professional service for heavily obstructed systems.
The Bottom Line
A clean dryer vent delivers one of the highest-value returns on effort in home maintenance. Once a year, less than an hour of your time protects your household in four critical ways:
- Fire safety — removes the #1 contributing factor to residential dryer fires
- Energy savings — restores efficient airflow and reduces utility costs
- Appliance longevity — eliminates the strain that shortens your dryer’s lifespan
- Indoor air quality — prevents moisture and lint particles from building up in your living space
Don’t wait for a problem to remind you. Put it on the calendar, follow the steps, and keep your home safer.
Next Steps: Take Action to Protect Your Home Today
Now that you know how to clean a roof-terminated dryer vent from the inside, here’s exactly what to do next.
1. Check Your Dryer Right Now
This takes less than five minutes:
- Run your dryer on high heat for a few minutes
- Feel for strong, steady airflow at the vent connection behind the dryer
- Check if the dryer exterior feels excessively hot
- Think back — are your loads taking longer to dry than usual?
Weak airflow, excessive heat, or longer cycles mean your vent needs cleaning now.
2. Gather Your Tools
Make sure you have everything before you start:
- Dryer vent cleaning kit with flexible rods (12+ feet for roof-vented systems)
- Cordless drill for the rotating brush attachment
- Vacuum or shop vac with hose attachment
- Screwdriver or nut driver for the vent clamp
- Flashlight for interior duct inspection
A complete kit runs $20 to $40 at most hardware stores.
3. Follow the Step-by-Step Process
Work through each step in order:
- Disconnect and pull the dryer away from the wall
- Detach the vent hose and inspect for damage
- Vacuum the exposed duct opening and dryer exhaust port
- Insert the cleaning brush and rods through the full duct run
- Vacuum again, reconnect, and run a test cycle
Take your time at bends. Don’t force the rods. Patience prevents duct damage.
4. Inspect Your Vent Hose Material
While the dryer is pulled out, check the hose connecting it to the wall duct:
- Plastic or foil accordion-style — replace immediately with rigid or semi-rigid aluminum duct
- Rigid or semi-rigid metal — inspect for lint buildup, loose connections, or damage
- Connections secured with screws — switch to foil tape or metal clamps to prevent lint snags
This one upgrade reduces future buildup and meets current fire safety standards.
5. Confirm Airflow at the Roof Cap
After cleaning and reconnecting:
- Run the dryer on high heat with no clothes for 10 to 15 minutes
- Have someone check the roof vent cap to confirm strong exhaust airflow
- If airflow is still weak, the blockage is likely at the roof cap itself
Can’t safely access the roof? Schedule a professional inspection.
6. Set a Recurring Maintenance Schedule
Put these on your calendar now:
- After every load — clean the lint trap completely
- Every 3 months — inspect the vent connection behind the dryer
- Every 6 months — check the roof vent cap for debris, pests, or flap damage
- Once a year — full interior vent cleaning using this guide
- Twice a year — if you run more than one load per day or dry heavy fabrics regularly
7. Know When to Call a Professional
Skip the DIY approach and call a certified technician if:
- Your vent run exceeds 20 feet or has more than two 90-degree elbows
- Airflow hasn’t improved after interior cleaning
- The roof cap is damaged, blocked by nesting, or sealed by debris
- You suspect disconnected ductwork inside the wall
- You’re not comfortable working around gas dryer connections
A certified technician can access the vent from the rooftop, inspect the full run with a camera, and clear blockages that interior cleaning can’t reach.
Start Today — Not Tomorrow
Every day a clogged vent goes unaddressed means elevated fire risk, higher energy costs, and unnecessary strain on your dryer. The entire job takes less than an hour, costs very little, and delivers results you’ll notice on your very next load.
Pick up a cleaning kit. Follow this guide. Take control of one of the most important — and most overlooked — maintenance tasks in your home.
Frequently Asked Questions
Q: Can I really clean a dryer vent that goes to the roof without getting on the roof?
A: Yes — and it’s how we recommend most homeowners approach it. After servicing thousands of roof-vented systems, we’ve found that a flexible rod cleaning kit powered by a cordless drill clears the vast majority of buildup from inside the laundry room.
This method works best when:
- The duct run is under 20 feet
- The system has fewer than two 90-degree elbows
- You work the brush slowly through each bend
- You repeat the process two to three times for thorough results
The most common mistake we see homeowners make is rushing through bends. This can disconnect joints or damage ductwork hidden inside the wall. Take your time — patience is what makes the interior method effective.
Q: How often should I clean a dryer vent that exits through the roof?
A: We tell every customer with a roof-terminated vent the same thing:
- Once a year at minimum — for standard household usage
- Twice a year — if you run more than one load daily or regularly dry heavy fabrics like towels, comforters, and bedding
Here’s what most homeowners don’t realize until we show them:
- Roof-vented systems accumulate lint faster than side-wall setups
- The vertical duct run forces lint to travel upward against gravity
- Lint settles at bends, clings to duct walls, and compacts over time
- By the time symptoms appear, the buildup has been developing for months
We’ve pulled solid lint plugs out of roof-vented ducts that homeowners had no idea were forming. That’s exactly the kind of situation that leads to dryer fires.
Q: What are the signs that my roof dryer vent is clogged?
A: After years of diagnosing these systems, here are the telltale warning signs that almost always point to a clogged roof vent:
- Longer drying times — clothes still damp after a full cycle. This is the earliest and most common indicator we hear from customers.
- Excessive heat — dryer exterior feels hot during operation. Heat isn’t exhausting properly through the duct.
- Burning or musty smell — lint trapped near the heating element or moisture backing up in the duct.
- Weak or no airflow at the roof cap — the clearest confirmation of a blockage, though hardest for homeowners to check.
- Increased laundry room humidity — moisture that should vent through the roof is being pushed back indoors.
- Visible lint around the trap housing or behind the unit — the system is under pressure, and lint is escaping where it shouldn’t.
If you’re noticing two or more of these symptoms together, the vent is overdue for cleaning. Don’t wait for all of them to appear.
Q: What tools do I need to clean a roof dryer vent from inside?
A: Based on what works best specifically for roof-terminated systems, here’s what we recommend:
- Flexible rod cleaning kit — look for kits rated for 12 feet or longer, since roof vent runs are typically longer than side-wall setups
- Cordless drill — powers the rotating brush to loosen compacted lint that manual brushing can’t dislodge
- Vacuum or shop vac — captures the lint the brush pulls back toward the opening
- Screwdriver or nut driver — disconnects the vent clamp behind the dryer
- Flashlight — inspects inside the duct before and after cleaning
A complete kit runs $20 to $40 at most hardware stores.
Important: Skip the leaf blower method and other DIY workarounds you’ll find online. We’ve seen the aftermath firsthand. More often than not, they:
- Push lint deeper into the vent
- Compact buildup at elbows
- Create a denser blockage that’s harder to remove
- Make the system more dangerous than before
Q: When should I call a professional instead of cleaning the vent myself?
A: Routine annual cleaning is well within most homeowners’ ability. But after years of working on these systems, we know exactly where the DIY approach hits its limits.
Call a certified dryer vent technician if:
- Vent run exceeds 20 feet or has more than two 90-degree elbows — the brush and rods lose effectiveness over longer, more complex runs
- Airflow hasn’t improved after interior cleaning — the blockage is likely at or near the roof cap, where the brush can’t fully reach
- Roof cap is damaged, blocked by bird nesting, or sealed by debris — requires rooftop access and often a cap replacement
- You suspect disconnected ductwork inside the wall — something we encounter more often than expected, especially in older homes
- You have a gas dryer and aren’t comfortable around the gas connection — caution should always win here
A certified technician can access the vent from the rooftop, run a camera through the entire duct, and clear obstructions that interior brushing can’t resolve. We’ve seen too many homeowners struggle for hours with a stubborn clog when a professional could resolve it in 30 minutes. For complex or heavily obstructed systems, it’s the smarter investment.
Ready to Tackle Your Roof Dryer Vent? Start With the Right Filter and Breathe Easier
Now that you know how to clean a dryer vent that goes to the roof from inside without hassle, take the next step in protecting your home’s air quality and HVAC efficiency. Browse Filterbuy’s complete selection of premium air filters — made in America and designed to keep your home’s air cleaner, safer, and working the way it should.