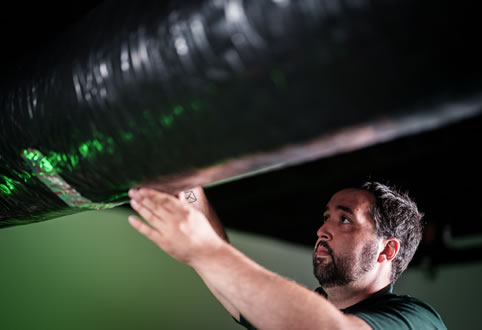
That torn duct is bleeding money from your energy bill right now.
After years of crawling through attics and crawl spaces across Central Florida, our technicians consistently find the same thing: homeowners paying to cool spaces they’ll never use because of ductwork gaps they didn’t know existed. A single tear can leak 20-30% of your conditioned air before it ever reaches your living spaces.
Here’s what we’ve learned from thousands of service calls: most torn duct repairs don’t require a professional visit. With the right materials and technique, you can fix common tears yourself for under $30. We’ll show you exactly how—plus when the damage actually warrants calling in an expert.
Stop losing air. Start saving money.
TL;DR Quick Answers
How do you fix a torn air duct?
Clean the damaged area, apply mastic sealant over the tear, then press UL 181-rated aluminum foil tape firmly into the mastic. Smooth all edges to create an airtight seal.
For small tears (under 2 inches):
- Clean the surface
- Apply mastic sealant
- Cover with foil tape
- Smooth edges completely
For larger tears (2–6 inches):
- Apply mastic around the tear
- Embed fiberglass mesh tape
- Add a second mastic layer
- Seal with foil tape
Materials needed:
- Mastic sealant (UL 181 rated)
- Aluminum foil tape (UL 181A-P or 181B-FX)
- Fiberglass mesh tape (for larger repairs)
Cost: Under $30.
Time: 30–60 minutes.
Important: Never use standard duct tape. It fails within 1–2 years. After years of duct repairs across Central Florida, we’ve seen countless failed duct tape fixes. Mastic and foil tape last a decade or more.
Top Takeaways
Five things to remember:
1. Torn Ducts Cost More Than You Think
- A single tear leaks 20–30% of conditioned air
- That’s hundreds of dollars wasted annually
- You’re paying to cool your attic—not your home
2. Most Repairs Are DIY-Friendly
- Damage under 6 inches? You can fix it
- Techniques are straightforward
- No specialized skills needed
3. Materials Matter
Use:
- Mastic sealant (UL 181 rated)
- Aluminum foil tape (UL 181A-P or 181B-FX)
Never use:
- Standard duct tape—it fails within 1–2 years
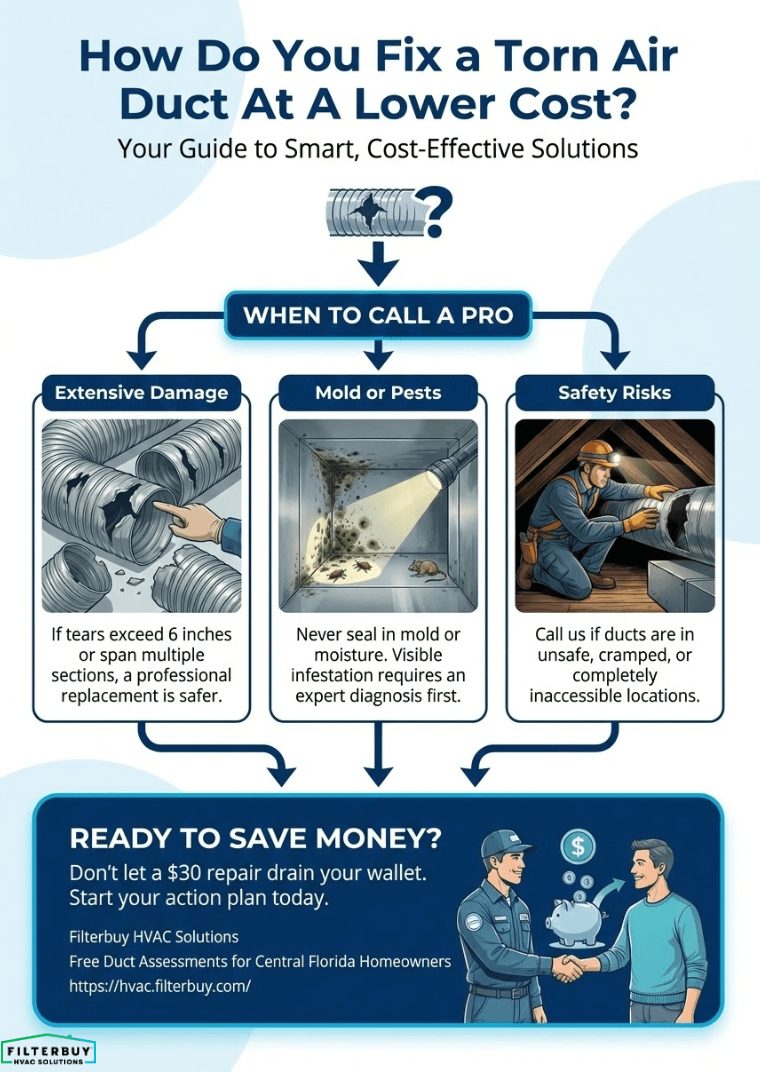
4. Know When to Call a Pro
Call for help when:
- Damage is extensive or spans multiple sections
- Mold or moisture is present
- Location is unsafe or inaccessible
5. The ROI Is Hard to Beat
- Repair cost: Under $30
- Annual savings: $200–400+
- Payback: 1–2 months
Assess the Damage First
Before grabbing supplies, you need to know what you’re dealing with. Not all duct damage is created equal.
Small tears and punctures under 2 inches are prime DIY territory. Gaps at connection points where sections have pulled apart are also straightforward fixes. We see both constantly during routine maintenance calls—and homeowners are often surprised by how simple the repair actually is.
However, crushed flexible duct, extensive deterioration, or tears longer than 6 inches typically require section replacement. Mold presence or pest damage also warrants professional assessment before sealing anything in.
Quick diagnostic: Turn your system on and hold your hand near the suspected damage. Feel air escaping? You’ve confirmed an active leak worth addressing.
Gather the Right Materials
The materials matter more than most homeowners realize. We’ve seen countless “repairs” fail within months because of one critical mistake: using the wrong tape.
What actually works:
- Aluminum foil tape (UL 181A-P or 181B-FX rated)
- Mastic sealant for permanent repairs
- Fiberglass mesh tape for reinforcing larger tears
- Sheet metal patches for rigid ductwork holes
What doesn’t work: Standard duct tape. Despite the name, it dries out and fails within 1-2 years on actual ductwork. Our technicians peel off failed duct tape repairs weekly.
Estimated cost: $15-30 for materials that will handle multiple repairs.
DIY Repair Methods by Damage Type
Small Tears and Punctures (Under 2 Inches)
- Clean the area thoroughly—dust and debris prevent adhesion
- Apply mastic sealant generously over and around the tear
- Press aluminum foil tape firmly over the mastic
- Smooth out all air bubbles and seal edges completely
This combination creates a permanent bond that flexes with temperature changes. Mastic alone works, but the tape reinforcement adds longevity we’ve seen hold up for 10+ years.
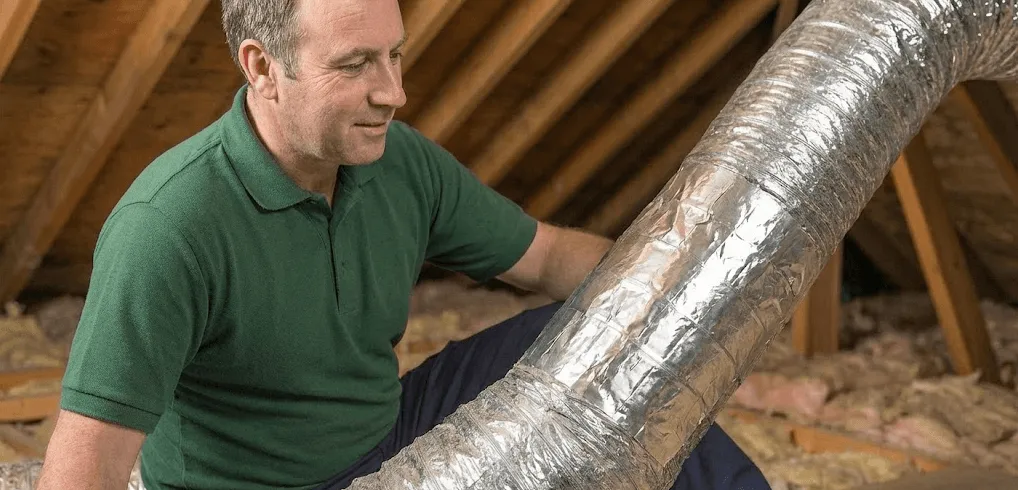
Connection Gaps and Separated Joints
Flexible duct pulling away from boots or rigid sections is the most common issue we encounter—especially in older homes where original clamps have loosened.
- Push the flexible duct back onto the collar or boot
- Secure with a metal clamp (not a zip tie—they break down)
- Seal the connection with mastic
- Wrap with aluminum foil tape for reinforcement
Pro insight: If the inner liner has separated from the outer insulation jacket, you’ll need to repair both layers independently before reconnecting.
Larger Tears in Flexible Duct (2-6 Inches)
- Clean and dry the damaged area
- Apply mastic around the entire perimeter of the tear
- Cover with fiberglass mesh tape, pressing into the mastic
- Apply a second mastic layer over the mesh
- Finish with aluminum foil tape over everything
This three-layer approach distributes stress across the repair area. We use this same method on service calls when a full section replacement isn’t necessary.
Holes in Rigid Metal Ductwork
- Cut a sheet metal patch 2 inches larger than the hole on all sides
- Apply mastic around the hole perimeter
- Press the patch firmly into place
- Seal all edges with mastic and foil tape
- For added security, use sheet metal screws at corners
When DIY Isn’t Worth It
Sometimes the lower-cost option is actually calling a professional. We tell homeowners this directly because a botched repair often costs more to fix than doing it right the first time.
Call an HVAC technician when:
- Damage exceeds 6 inches or spans multiple sections
- Ductwork shows signs of mold or moisture damage
- Flexible duct insulation is saturated or heavily compressed
- The tear is in a difficult-to-access location
- Your system is 15+ years old with multiple problem areas
A professional duct repair typically runs $150-400 depending on accessibility and extent. Full section replacement ranges from $250-700. Compare this against the $300-500 annual energy loss from significant unrepaired leaks, and the math often favors professional intervention.
Prevent Future Tears
Once you’ve made repairs, a few simple practices keep your ductwork intact longer:
- Change filters regularly. Clogged filters increase system pressure, stressing duct connections.
- Keep ducts supported. Sagging flexible duct eventually tears at stress points.
- Address pest issues promptly. Rodents cause more duct damage than most homeowners realize.
- Schedule periodic inspections. A visual check during annual maintenance catches small problems before they become expensive ones.
The Bottom Line
Most torn air duct repairs cost under $30 and take less than an hour when you use the right materials and techniques. The key is proper assessment, quality materials (skip the standard duct tape), and knowing when the damage exceeds DIY scope.
Your ductwork shouldn’t be leaking your comfort—or your money—into spaces you’ll never use. A weekend afternoon and minimal investment can restore your system’s efficiency and lower your energy bills starting immediately.
“We crawl through attics every day and see the same thing: ‘repaired’ ducts leaking air because someone used the wrong tape. The right materials cost maybe $10 more and last a decade—the wrong ones have us back in your attic within a year.”
— Filterbuy HVAC Solutions Service Team
Essential Resources
Trusted Resources We Recommend to Our Neighbors
After years of repairing ductwork in homes throughout Central Florida, we know that informed homeowners make better decisions. These are the same resources we point our customers to when they want to understand the “why” behind our recommendations—or when they’re tackling a straightforward repair themselves.
1. Understand Why the Right Sealant Matters
We can’t tell you how many times we’ve crawled into an attic and found duct tape peeling off a repair that’s only a year old. The Department of Energy explains exactly why mastic sealant works and duct tape doesn’t—and walks you through proper application step by step.
Source: U.S. Department of Energy – Minimizing Energy Losses in Ducts
URL: https://www.energy.gov/energysaver/minimizing-energy-losses-ducts
2. Get Started with a Homeowner-Friendly Guide
If you’re comfortable working in your attic or crawlspace, ENERGY STAR’s guide is a solid starting point. It’s written for homeowners, not technicians, and covers the basics we’d share with you over the phone if you called asking where to begin.
Source: ENERGY STAR – Duct Sealing Guide
URL: https://www.energystar.gov/saveathome/heating-cooling/duct-sealing
3. See What a Professional-Quality Repair Looks Like
When our technicians seal ductwork, we follow industry-standard protocols. This DOE checklist shows you exactly what those standards are—so whether you’re doing it yourself or hiring someone, you’ll know what “done right” actually looks like.
Source: U.S. Department of Energy – Building America Solution Center
URL: https://basc.pnnl.gov/home-improvement-expert/checklists/duct-sealing-and-insulation
4. Match Your Repair Method to Your Duct Type
Not all duct damage is the same, and neither are the fixes. NADCA’s guide breaks down which techniques work best for flexible duct versus rigid metal—something we wish more homeowners understood before attempting repairs that don’t hold up.
Source: National Air Duct Cleaners Association (NADCA)
URL: https://nadca.com/blog/beginners-guide-duct-sealing
5. Choose Tape That Actually Meets Code
Here’s something most folks don’t realize: HVAC tape has specific ratings for different duct types. Grab the wrong one and your repair might not pass inspection—or worse, it’ll fail within months. This quick guide explains what to look for on the label.
Source: Tape University – UL 181 HVAC Tape Standards
URL: https://tapeuniversity.com/products/foil-tapes/ul181ap-ul181bfx/
6. Find Leaks You Can’t See with Professional Testing
Some duct damage isn’t visible—it’s hidden behind walls or buried under insulation. When we suspect a homeowner has leaks they can’t locate, we often recommend a professional energy assessment. Blower door tests and thermal imaging find what eyes can’t.
Source: U.S. Department of Energy – Professional Home Energy Assessments
URL: https://www.energy.gov/energysaver/professional-home-energy-assessments
7. Connect with a Qualified Contractor You Can Trust
If a repair is beyond DIY scope, ACCA’s directory lists contractors who meet the same quality standards we hold ourselves to. We’d rather point you toward a trustworthy professional than see you stuck with shoddy work from someone cutting corners.
Source: Air Conditioning Contractors of America (ACCA)
URL: https://hvac-contractors.acca.org/qa-contractors
Supporting Statistics
Government statistics confirm what we observe every week in Central Florida attics and crawlspaces. Here’s what the research shows—and what it means for your home.
20–30% of Your Conditioned Air Never Reaches Your Rooms
The data: ENERGY STAR reports that the typical home loses 20–30% of conditioned air through duct leaks, holes, and poor connections.
What we see:
- Homeowners assume a “small” tear is a minor issue
- We’ve pressure-tested systems where a single 4-inch tear caused nearly half the total leakage
- In Florida’s summer heat, that air dumps straight into a 140-degree attic while your AC works overtime
The pattern: Homes with the highest utility bills almost always have ductwork problems hiding in plain sight.
Source: U.S. Environmental Protection Agency – ENERGY STAR
URL: https://www.energystar.gov/saveathome/heating-cooling/duct-sealing
Leaky Ducts Add Hundreds to Your Annual Energy Bills
The data: The Department of Energy states leaky ducts can add hundreds of dollars a year to heating and cooling costs.
Why it’s worse in Florida:
- Government estimates assume moderate climates with seasonal HVAC use
- Central Florida homeowners run AC eight to nine months—sometimes year-round
- A tear costing $200 annually in Virginia can hit $400+ in Orlando, Sanford, or Kissimmee
What customers tell us:
- They call, expecting to need a new AC unit
- The real culprit is usually ductwork damage that they didn’t know existed
- A $30 repair ends up saving $25+ every month
Source: U.S. Department of Energy
URL: https://www.energy.gov/energysaver/minimizing-energy-losses-ducts
Duct Damage Reduces HVAC Efficiency by Up to 20%
The data: ENERGY STAR confirms leaky ducts can cut system efficiency by as much as 20%.
The downstream effects we see:
- Compressors failing prematurely
- Blower motors are burning out
- Systems that can’t maintain temperature, no matter the thermostat setting
One pattern we’ve noticed: Homes with “duct tape repairs” have the worst efficiency losses. That tape fails within 1–2 years in attic heat—by the time we arrive, the system has been hemorrhaging air for months.
After proper sealing, customers report:
- Rooms that were always too hot or cold finally feel comfortable
- Noticeable drops in their next electric bill
- Efficiency gains that compound month after month
Source: U.S. Environmental Protection Agency – Benefits of Duct Sealing
URL: https://www.energystar.gov/saveathome/heating-cooling/duct-sealing/benefits
The Bottom Line
We’re not here to scare you into unnecessary repairs. But we’ve watched too many families pay inflated bills for years because no one mentioned a $30 fix could solve the problem.
The math is simple:
- Repair cost: Under $30 for most DIY fixes
- Annual savings: $200–$400+, depending on damage severity
- Payback period: Often within 1–2 months
Whether you tackle it yourself or call us, fixing that torn duct is one of the smartest investments you can make.
Final Thought & Opinion
Our Take: The Most Overlooked Fix in Home Maintenance
After years of diagnosing comfort complaints across Central Florida, we’ve developed a strong opinion about duct repairs.
They’re the single most undervalued home improvement—and it’s not even close.
The Disconnect We See Daily
Homeowners invest in:
- $500 smart thermostats for marginal efficiency gains
- $10,000 high-SEER systems expecting lower bills
- Annual tune-ups and premium air filters
Meanwhile, a torn duct is leaking 25% of their conditioned air into the attic. Ignored for years.
The truth: Homes with the lowest energy bills don’t have the newest equipment. They have properly sealed ductwork.
What Most “Experts” Won’t Tell You
Our industry tends to push equipment upgrades over simple repairs. New systems mean bigger invoices. Duct sealing doesn’t.
Here’s what we tell our neighbors instead:
If your ductwork has tears, gaps, or failed connections:
- That new high-efficiency system won’t hit its rated performance
- Your smart thermostat is optimizing a broken delivery system
- You’re solving the wrong problem with the wrong solution
Fix the ducts first. Everything else works better once you do.
Why We Encourage DIY Repairs
We’re HVAC professionals. We make our living on service calls. So why tell you to fix it yourself?
Because we’ve seen what happens when small problems get ignored.
A $30 repair today prevents:
- $400+ in annual energy waste that compounds year after year
- Premature system failure costs thousands to replace
- Unnecessary equipment upgrades chasing the wrong problem
When you handle the simple stuff, you’re not taking work from us. You’re preventing expensive failures we’d rather you never face.
Know Your Limits
Most torn duct repairs are DIY-friendly. But call a professional when:
- Damage spans multiple sections or exceeds 6 inches
- You find mold, moisture, or pest damage
- Ductwork is inaccessible or in hazardous locations
- Your system is 15+ years old with recurring issues
Knowing when to DIY and when to call for help isn’t a weakness. It’s wisdom.
Next Steps: Your Action Plan
Stop losing money. Start here.
1. Inspect Your Ductwork
Time required: 20–30 minutes.
Do this now:
- Turn your HVAC system on
- Check attic, crawlspace, or basement ducts
- Look for tears, gaps, or disconnected sections
- Feel for escaping air at joints
- Note any failed duct tape repairs
2. Decide: DIY or Pro?
Handle it yourself if:
- Tear is small and under 6 inches
- Damage is easy to access
- Connection is loose but intact
- No mold or moisture present
Call a professional if:
- Multiple areas are damaged
- Mold, moisture, or pests are visible
- Location is hard to reach
- The system is 15+ years old with recurring issues
3. Get Materials (DIY Path)
Buy these:
- Mastic sealant (UL 181 rated)
- Aluminum foil tape (UL 181A-P or 181B-FX)
- Fiberglass mesh tape
- Metal hose clamps
Skip these:
- Standard duct tape
- Zip ties
- Generic tapes
Cost: $15–30.
4. Make the Repair
Small tears (under 2″):
- Clean surface
- Apply mastic
- Press foil tape into mastic
- Smooth all edges
Loose connections:
- Reconnect the duct to the boot
- Secure with a metal clamp
- Seal with mastic
- Wrap with foil tape
Larger tears (2–6″):
- Apply mastic around the tear
- Embed mesh tape
- Add a second mastic layer
- Finish with foil tape
Time: 30–60 minutes.
5. Verify Your Work
Immediately:
- Run system
- Check for air leaks at the repair
Within 30 days:
- Revisit repair
- Compare energy bills
- Note comfort improvements
6. Call a Pro (When Needed)
Contact a professional if:
- Damage is extensive
- Mold or pests are present
- Location is inaccessible
- The system is 15+ years old
Ask for:
- Free estimate upfront
- Plain-language explanation
- Post-repair verification
Quick-Start Checklist
- Inspect ductwork
- Document damage
- Choose DIY or pro
- Buy the correct materials
- Complete repair
- Verify it’s holding
- Monitor the next bill
- Schedule annual inspections
Need Help?
Filterbuy HVAC Solutions offers free duct assessments for Central Florida homeowners.
What you get:
- Honest damage evaluation
- Clear repair recommendations
- No-pressure guidance
We’ll tell you what you can fix yourself—and what we should handle.
Schedule your free assessment today.
FAQ on “How Do You Fix a Torn Air Duct?”
Q: What is the best material to fix a torn air duct?
A: Mastic sealant combined with UL 181-rated aluminum foil tape.
Why this works:
- Mastic creates a flexible, permanent bond
- Foil tape reinforces and reflects radiant heat
- Both withstand extreme temperature swings
What we’ve seen in the field:
- Mastic-and-foil repairs last 10+ years
- We rarely see callbacks on this method
- Other approaches fail at higher rates in Florida’s climate
Pro tip: One application done right beats multiple repairs done wrong.
Q: Can I use duct tape to fix a torn air duct?
A: No. Standard duct tape fails within 12–18 months on actual ductwork.
Why it fails:
- Rubber-based adhesive can’t handle temperature extremes
- Attic heat (140°F+) softens the adhesive
- Cold cycles make it brittle and crack
- Eventually loses grip completely
What we find in the field:
- Homes with “mystery” efficiency losses almost always have failed duct tape repairs
- Adhesive crystallizes and crumbles over time
- Homeowners thought the problem was fixed years ago
Use instead:
- Mastic sealant (UL 181 rated)
- Aluminum foil tape (UL 181A-P for rigid, UL 181B-FX for flex)
Q: How much does it cost to fix a torn air duct yourself?
A: Under $30 for most repairs.
Typical costs:
- Mastic sealant: $8–15
- Foil tape: $10–15
- Fiberglass mesh tape: $5–10
The real math:
- One torn duct wastes $200–400 annually
- A $25 repair pays for itself in weeks
- ROI is immediate during the peak cooling season
What we tell homeowners: A hardware store trip often solves problems people assume need major work. We’ve pointed many customers toward DIY fixes instead of expensive service calls.
Q: When should I call a professional instead of fixing it myself?
A: Most small tears under 6 inches are DIY-friendly. Call a professional for complex situations.
Handle it yourself when:
- Tear is small and accessible
- No mold or moisture present
- You’re comfortable in attics or crawlspaces
- It’s a single problem area
Call a professional when:
- Damage exceeds 6 inches
- Multiple sections are affected
- Mold, moisture, or pest damage is visible
- Ducts are in unsafe or inaccessible locations
- The system is 15+ years old with recurring issues
- Previous repairs keep failing
Our honest take: Fix the simple stuff yourself. Save professional help for problems that genuinely need expert diagnosis.
Q: How do I know if my duct repair is working?
A: Check three things: immediate seal, 30-day hold, and utility bill impact.
Immediately after repair:
- Run your HVAC system
- Feel for escaping air at the repair site
- Check all edges for gaps or lifted tape
Within 30 days:
- Revisit the repair after temperature swings
- Confirm adhesion is holding
- Note any comfort improvements in problem rooms
On your next utility bill:
- Expect noticeable savings within one billing cycle
- Some homeowners report $20–40 monthly drops
- Rooms that were always too hot or cold should normalize
The real test: When conditioned air reaches where it belongs, you’ll feel it throughout the house—and see it on the bill.
Ready to Fix That Torn Duct and Start Saving?
Whether you tackle it yourself or need professional help, don’t let a $30 repair keep draining hundreds from your wallet each year. Contact Filterbuy HVAC Solutions today for a free duct assessment—we’ll tell you exactly what needs fixing and the most cost-effective way to get it done.